Here's an in-depth tutorial on a number of different techniques used to when building all my foamboard terrain. Using foamboard itself is not very complex, but it does require a bit of care and practice for those just getting started with it.
In this post, I'll go into detail with building a plain room (which I later expanded into the terrain set shown above). Afterwards, I'll touch briefly on a few slightly more 'advanced' cuts which can be used to add more variety and interest to your foamboard terrain, such as curved walls and stairs.
Materials
- Pencil - To mark where to cut when measuring.
- Metal Ruler - To measure with and use as a straight edge while cutting. I, myself, happen to use 3 different sizes (6", 18", and a 24" T-Square) to suit however long my cut needs to be at the time.
- Cutting Mat - There's the superb self-healing mats available at any craft store, but the back of certain sketchpads and notebooks will due as well for a time (they will eventually wear out though).
- X-Acto Hobby Knife - Any sharp blade will due, but these have the cheapest blades which you will need a lot of to use as replacements when your blade starts to dull. Dull blades are bad, as they increase the risk of tearing the foam where you cut, making the edge look sloppier.
- Foamboard -There's a decent variety you can use, usually it just comes down to what's easily available near you and the chief difference is just color. When possible, buy from an art store and not an office supply store.
When selecting foamboard, warping is the biggest concern. High humidity can cause large sheets to bend, and forget about it if it actually gets wet (ie don't carry it around outside when it's raining), though once it's cut down to small pieces, glued together for stability, and painted over, it'll be fine. Knicks and damage to the edges are a bit of an inconvenience, but you can always cut around them if there's no other choice.
Anyways...
Building a Square Room
The first step is to measure and draw out where all your cuts are going to be. Usually, I only plan out sections at a time (rather than the whole project), and I try to keep a clean cut all the way across the sheet whenever possible, to preserve the flat edge and right angles for future use. You might notice, I made the pencil markings very light, that's so that they're easily erasable if I mess up and so that they don't leave much in the way of marks after the cut is made either.
For this project I'm going with a 9x9 floor, and four 9x2.5 walls. Usually, anywhere between 2-3" for walls looks normal, though 2" can be a little cramped in the case of tall models which might hit the ceiling.
Once all the markings have been made for the floor and sides, it's time to cut. Since my metal ruler is cork-backed, I turned it over so that the metal part is flush against the foamboard, helping to ensure that the cuts are exactly on the lines.
Also, I try to keep as much pressure on the ruler as possible with my non-cutting hard to steady the knife against and ensure it doesn't slip along with my cuts. Attempting to keep the blade perpendicular to the sheet, I try to cut with the blade roughly at a 30 degree angle, that way, when it's fully through the foamboard, the full length of the blade with be used to cut it. (a little weird to explain all of this without a visual demonstration)
Oh, another tip, try to make each cut smoothly from beginning to end without stopping somewhere in between, this is mainly to avoid accidentally altering the angle your cutting at, which could leave to an uneven finished edge (not a big deal, but can be noticeable, probably just to you though).
Two big things to watch out for when cutting:
First, that you're using a sharp blade. They have a tendency to dull quickly, especially when cutting paper, so it's nice to have a large stack of replacements nearby, with exacto knifes, they're fairly cheap. I picked up a pack of 40 replacement blades for about 6usd, when I was buying my foamboard.
Second, the old saying of 'slow is smooth and smooth is fast'. This is definitely true when cutting foamboard. It's better to slowly cut through the material with multiple cuts than to try to slice it with just one. When using foamboard with especially thick paper on both sides, I'd advise using at least three cuts; a shallow initial cut to pierce the top layer of paper, at least one smooth cut just for the foam inside, and then a hard last cut to get the final layer of paper in one slice (beware of shifts in your posture as this can change the angle at which you're holding your blade).
The picture above is an example of some minor tearing that can occur because of either of these two things, though more often than not it's the latter as even a semi-dull blade will produce a clean edge with cautious cuts.
Here's a quick example of trying to get straight cuts. The left side ended up being a little off-angle while the right side is about perfect. There's really no surefire guaranteed way of getting that perfect angle that I can think of aside from just practice and use of your best judgement.
If the angle is good, the piece will stand up on the edge unsupported.
If it's not a good angle, I like to place it so that the short side is facing towards the interior of the building, it's less apparent that way with the finished product (the glue will fill most of the crevasse anywas but I'll get to that later).
After my floor and walls are cut out, next was to decide how large I wanted my doors to be. With most basic infantry models, the usual size is about 1 inch wide by 1.5 inches tall. For residential areas, you may not want doors to be much wider (maybe an extra .25" for throughways) or much taller.
For commercial/industrial areas though, I prefer around a 2x2 opening. This allows enough space for two models to sit comfortably side by side in the doorway with enough overhead space in case they have any weaponry or limbs held above their head. It's also plenty of space for Remotes and Motorcycles to travel through with ease.
What do you know, I did have a picture of the general angle I use with my blade when cutting. Of course my other hand would be pressing down on the ruler if it weren't holding the camera.
The cuts for making doors and windows can be a little more annoying.
Instead of going straight through the foamboard from end to end, you're forced to start and/or stop somewhere in the middle. The biggest issue in this is blade control, getting those corners tight as well as keeping the right angle with the constant repositioning of the blade so that the other side stays on the line and doesn't go beyond the corners.
Rabbet Cuts (optional)
This next part is completely optional and can be skipped at this particular moment if desired.
Basically, I'm going to cut a rabbets into the ends of two walls. This will allow the other walls to fit into them flushly and conceal the foam where they meet. For tabletop gaming, this is not really necessary, but it helps enhance appearance.
The rabbet (cut) should be placed with enough space for another piece of foamboard to fit right in. In most cases, this is around between the 3/16" and 5/32". You'll want to be very careful and not cut the bottom layer of paper, just the top layer of paper and the foam.
Once you've made the vertical cut, next you make a horizontal cut along the bottom layer of paper to cut the foam off. It's better to be safe and leave foam still attached than to accidentally cut into and through the remaining paper. The leftover foam can always just be scraped off.
This is what it should look like when done cutting.
With this particular rabbet cut, I was a little short on the measurement, so I'll have to cut a little more foam off to get it to line up just right.
Assembling the Room
With all my walls done, I lay them out where I'm going to glue them.
For glue, I prefer using tacky glue, it's very solid and fast-drying. Also, the paper will usually tear before the glue gives way, so make sure you've got it all lined up and ready before you start gluing stuff down.
I've tried PVA glue before, it's a little bit flimsier and takes a bit longer to dry, allowing for some readjusting. Also, it's weak enough that it may not damage the paper when pulling pieces apart with enough car.
With the walls glued on, this is how the corners should look if the foam properly fits into each other.
Once everything is fitted together properly, all the excess glue was skimmed off using a discarded piece of foamboard (one of the doors). A little extra glue was applied into any apparent crevasses from off-angle cuts, and skimmed off as well.
And that's that, the finished product. With a little practice, the cuts become second-nature and you can eventually move onto more complicated layouts. The only difference is just the amount of cuts you have to make.
Windows and Waist-High Barriers
When adding windows and waist-high walls to my terrain, I tend to aim for 0.5-0.75 inches high. Somewhere around in there should be just the right height that units in Infinity can move over them without restraint. Also, keep in mind that if adding the wall on top of a floor piece (like I did in the sample building) the ledge will be around 3/16" higher from the outside, making it possible to leave the building through a window unhindered but not enter it.
Here's another room I put together using different shapes for the doors and windows.
And another one using a non-retangular shape, with waist-high walls around the balcony and simpler doors and windows that don't have tops to them.
With that, here's a fairly decent example of a proper terrain density for Infinity, using buildings similar to that in the last picture. All in all, I'd say this set used about 3 or 4 20x30" sheets, which, on a good day, only cost about 1.50 each when on sale at the local art store.
[Update 3/17/13]Figured I would just go ahead and consolidate everything I had foamboard related just into this one thread.
First, a back-track to when I was cutting rabbets on the ends of my walls so that they'd fit flush into one another. You can handily glue two pieces of scrap together, with about enough offset so that one piece will sit flush atop a flat piece of foamboard and the other on the cutting mat. This makes for a very quick guide to measure just where you need to place your rabbet cuts at.
Just stick the ruler flush up against it then drop the piece of scrap for a knife and start cutting.
Mider Cuts
Since we covered rabbet cuts along the edge of foamboard pieces, I might as well get into how to do them in the center of foamboard pieces.
First, you're going to go ahead and cut two vertical lines parallel to each other spaced just slightly over the width of a piece of foamboard so that a piece will fit in snugly but without having to squeeze its way in. As with the rabbet cuts, be sure not to slice into the bottom layer of paper, you just want to cut the top layer and the foam.
Once that's done, now you have to remove the foam between the two cuts. With certain types of foamboard, you could probably pluck it right off; otherwise, it'll have to be scraped out. To make this easier, I like to cut out as much as possible before I start scratching at it.
To do this, I make two 45 degree angle cuts across the gap (this is a good time to practice those), which should get about 3/4ths of the foam out.
For that last little strip stuck to the bottom layer of paper, I use a blunt sculpting tool I have laying around to scrape it out with no fuss (this can be a bit more difficult without the diagonal cuts clearing the rest of the foam out first). My 3D Design teacher also insists that you can use your fingernail for this, but as a guy, my fingers are just too fat to fit into that small of a gap.
With the foam cleared out, this is what the Mider should look like.
With the mider cut done, another piece of foamboard should now be able to easily slide in. This comes in very handy when building multi-room buildings.
Alternatively, you can just fold one side of the piece into the mider to form a 90 degree corner with a solid fold of paper along the outside of the corner (as opposed to when the corner is formed where two separate pieces meet).
V-Groove Cuts
Speaking of having solid folds of paper where corners are formed...
This go around, you're only going to make one vertical cut through the foam but not the bottom layer of paper. You'll then make a 45 degree diagonal cut to meet that vertical cut at the bottom. To make this easier, I like to draw out where the cut is supposed to break the top layer of paper and then do a preemptive cut that only breaks the paper layer. This allows you to focus on maintaining the angle of your diagonal cut (in addition to not cutting the bottom layer of paper) without having to fight the resistance of that top layer of paper.
Here's how it should look with the diagonal cut made.
You can use up to this step to make any number of obtuse angled corners depending on the angle at which you made the diagonal cut.
Moving on, to complete the V-Groove cut, just repeat the diagonal cut from the other side (surprise surprise).
There you have it, two 45 degree diagonal cuts equate to a right angle corner. As before, you can make a variety of acute angled corners depending on what angle you make your diagonal cuts at.
Making a Curved Wall
This one's pretty simple, you're basically just making a large number of vertical cuts which should be evenly spaced out. Around 1/4" space between each is is pretty good for forming a wall that'll curve around a circle with a 6" diameter. Of course, you'll have to keep making the cuts until you've covered a distance that'll reach that far.
Here's what the curve looks like with just 2.5" worth of cuts made.
Conversely, you can get much tighter curves bending the foamboard the other way around with the cuts facing outward.
Here's what a whole wall looks like curved around half a 6" diameter circle. As for cutting out the circle, that requires a drafting compass and some decent freehand cutting. Or maybe now would be a good time to pick up a set of French Curves and make all sorts of wavy walls.
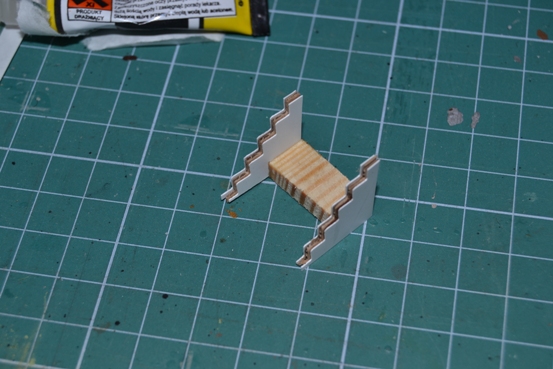
Making Stairs
Here's a quick guide how to form stairs when you get around to making multistory buildings.
First, trace out where the steps are going to go along the wall (which will serve as an anchor for the stairs). Generally, I try go with each step being 0.5" tall (a height that's less than waist-high on most Infinity Models, allowing them to move up unhindered) and 0.75" tall (a width on which most 1" wide bases will still balance upon without falling off).
With that, you can cut out the steps from a sheet of whatever desired width. 0.5" for the vertical pieces and 0.75" for the horizontal pieces. The very bottom piece will have to be cut short by the width of the foamboard in order to fit.
When you start gluing, the easiest way will be to glue the edge that'll stick to the wall as well as the edge that'll stick to the next piece to go down.
Then you just repeat sticking pieces to the wall and previous piece until you're done.
And bam, stairs. Easy peasy. Really, the hardest part to stairs is just figuring out how their dimensions will fit into the rest of the building with the transition between the floors.
In the front, an alternative form of the stairs where I cut the wall out where the steps were going to be and then placed the horizontal steps directly on top of them (in this case, I used rabbet cuts on the steps). With this method, the steps can be 0.5" wide instead of 0.75" as part of the model's base can now fit under the next step up.
Meanwhile, the stairs in the back were formed using the step-by-step method above with another wall glued onto the other side of the stairs and designed to be a stand-alone terrain piece which could be used modularly to reach exterior platforms or balconies.
Lastly, the horizontal and vertical pieces of steps can be combined into one piece if desired by simply using a mider or v-groove. If you're really ambitious, you could even just make all the steps one piece by alternating which side the cuts are on.
Anyways, here's one of the simplest things you can make with stairs: a raised platform.
Turned over, it's revealed that the piece is just a square room turned upside down, stairs attached to the side, and 0.5" high railings added to the ledges for cover.
Adding interest to your Foamboard
Once you've built your structures, then it's time to make them more interesting to look at. The two primary ways to do this are to add color and/or add decorations.
In regards to color, airbrushing is usually the primary way professionals would do it, but *shrug* if you're reading this then it's alright if you're not at that level yet (I certainly am not). In consolation, spray paint should be alright for most good-quality foamboard but you'll still want to test it out on a piece of scrap just to ensure that the foam doesn't melt. There's also the additional options of just applying paint by brush or simply using a black permanent marker to add designs onto the foamboard.
For decorations, the simplest thing is just to glue on additional pieces of foamboard, plasticard, or foam pvc. Such a simple addition took this flat piece of foamboard and made it look more like a reinforced wall.
There's also the option of utilizing random objects laying around, such as cans, and incorporating them into your project.
One other trick I like to do when using spray paint on my buildings is to spray the interior first, then flip the piece upside down and spray the exterior afterwards.
With all that, you should be able to easily put together a more than useable set of terrain for Infinity (ignore my still unpainted objective room in the center).
Maybe something a little more 'urban' (which I never got around to fleshing out and painting).
Or, you can even go all out and make a huge complex of halls, stairs, bridges... once you got it down, it's easy to make just about whatever you want to play on/in.
Logan/Foamwerks
And now that I've wasted all your time talking about how to cut up foamboard, here's a quick word on something that can make your life easier when you are actually cutting the foamboard. These tools basically make your life much easier when it comes cutting foamboard. I've never used them but perusing their site briefly, they seem to have a tool for straight cuts, rabbet cuts, v-groove cuts, and circular cuts.
That said, knowing the techniques will still come in handy figuring out different ways to apply them to your projects.
Making Foamboard Ruins
Thinking on things that Foamwerks can't do, the big one I can think of is cut at various odd angles rather than just vertically or v-groove. So with that, here's a step-by-step on how I made some ruins using foamboard and 'stationary aisle' cork.
A brief overview of what you'll need in addition to the usual supplies: cheap cork sheets and sand.
First, I cut out the general size I wanted the piece to be at maximum for both the cork base and foamboard. I also marked where the big los-blocking wall was going to be on both pieces.
Next, I made some random cuts to make the foamboard sheet an irregular shape. I then traced an outline of the foamboards shape onto the cork sheet.
With that, I tore chunks out of the cork sheet to get it to roughly match the foamboard's shape, with a little more liberal 'roughness' around the edges. I then traced that new shape back onto the foamboard.
I then made some cuts across the foamboard to simulate cracks and whatnot, making sure to keep the spots lined up where they needed to be on top of the foam.
Following the cracks and the new trace on the foamboard, I made a lot of random cuts at off angles along the edges of the foamboard pieces. It is fairly important at this point to use care not to tear up the foam with the cuts to help keep the sheet's integrity in tact.
The piece is ready for the los-blocking walls to go up. For this piece, I'm keeping it relatively simple and just using a right angle corner. I cut the walls into random shapes, using a rabbet cut to connect them at the corner and ensuring their edges met at the same spot at that corner. Do not glue them down or together just yet.
Those walls were then cut up with off angles, my emphasis was on jagged cuts into the walls, along with some shallow v-grooves to trace the cracks into the walls. The vast majority of the cracks were kept to the exterior of the wall. To balance that out, I stuck a little ledge up on the interior of the corner.
I sort of dropped the ball on pictures after this point. Short story, I added some random bits of foamboard to the ruins, trying to keep it still relatively flat due to Infinity's need for base-to-base contact for cover with the wall (though the base is high enough to provide cover to infantry as well).
After that, I glued the tiny cork bits around in piles on the piece. covering up all the big blank sections where foamboard connects at sharp angles as well as filling any gaps left by the assorted placement of foamboard. Sand was then placed around after that to get the rest of the open spots and to soften the texture transitions between the cork and foamboard.
Here's what the completed set of ruins looks like tossed in with my trees and hills for a Paradiso scenario.
---------
One last thing I will say about the simple rooms as opposed to complex things such as those ruins I made. Square rooms stack up for storage
very easily whereas those ruins, or other, equally complex terrain pieces, require a decent bit of care to store and transport.
Well... I think I covered almost everything I know as of now. Any questions/comments/critiques/suggestions are always welcome. Looking back at all the pictures of my terrain... damn, I have made a lot of different complete terrain sets out of foamboard over the past 6 months - I guess that's a side effect of knowing how to make terrain. I guess I've just become kind of finicky about my terrain since I can always just make a new piece to replace any I'm not happy with.