
I've
always thought that a modern zombie horde would be dead cool! (ahem...
sorry). So I've picked up a bit of zombies everytime I came across some.
But it was not until I saw the before and after Ashlee zombie by
Hasslefree that gave me the inspiration to start the project. A brief
shopping spree later, I ended up with a whole bunch of rotting
miniatures. With the huge number of variants in the market, there is
really no need to buy more than one of any of the miniatures! I love
variants and so that is perfect. Most of the figures I bought in wave 1
are done now, and when I gather more funds, the unpainted side will grow
again.
Note that the following are my personal opinions. Your own experiences may vary.
Anyway, here are some manufacturers that make zombies suitable for modern day apocalypes.
You can see this page translated into Polish at
figurki.net.
Click
here to see updates made to this page.
Click here to go to the
index.
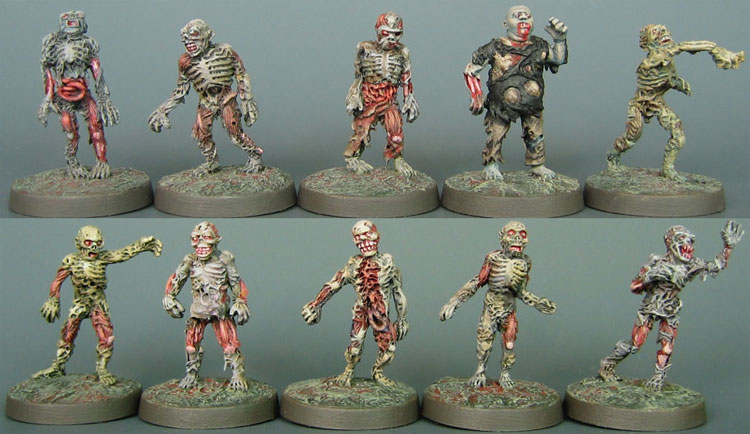
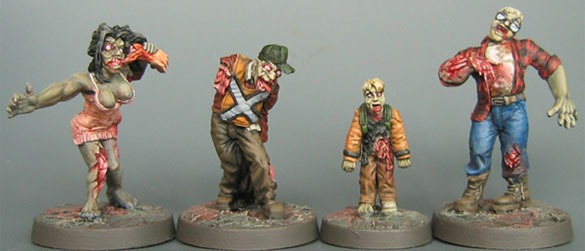
Cold War Miniatures
http://cold-war.co.uk/
Probably
the largest range of modern zombies on the market, and the easiest way
to jam your table with maximum number of different zombies.
I'm
not quite sure who the sculptor for this range is but it's pretty safe
to bet he is a fan of zombies! I don't have the entire range, so only a
few posted here. There are many many more sets available, each sold in a
group of 5.
These figures comes with a peg on their leg, and
also included are pre-textured bases with a corresponding hole for the
peg. The bases are all pretty nice depicting sidewalks with road,
pavement, tiles, and what not, some of which also have some rubbish like
a drink can (I did not use them because I wanted them to have the same
basing as my other zombies). The miniatures are approximately 28mm from
sole to eye.
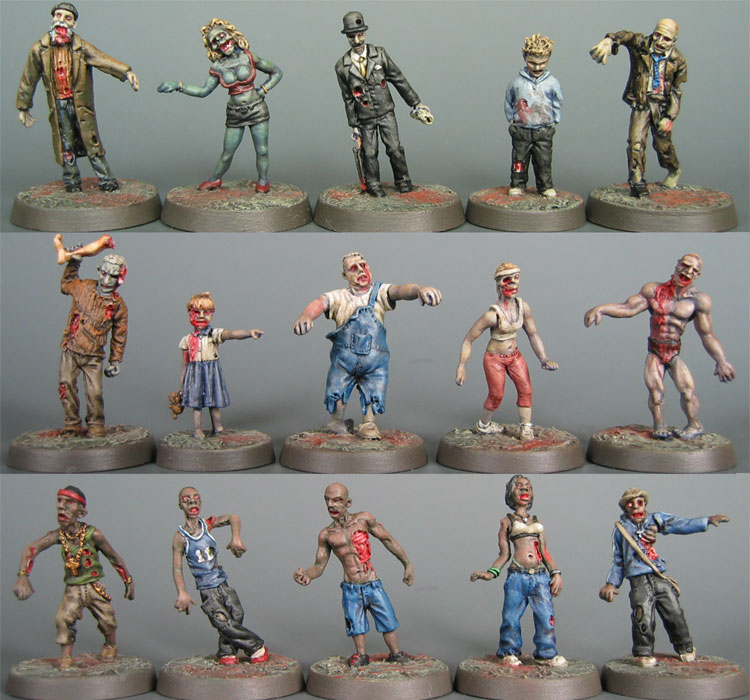
Sculpting:
I've read some complaints on the sculpting for these online but I don't
mind them much. They are a bit on the thin (and flat) side so if you
don't like that, best to avoid or at least try with one or two packs
first. Some of the details are also a bit rough. But I personally quite
like the more realistic proportions which makes the horror ones more
horror and the funny ones more funny. But the best things about these
sculpts is the very strong genre feel. It doesn't get much more modern
zombie survival then these folks.
Casting: Castings are good but
you have to be careful with a few of the more fragile ones (due to the
thin sculpt). Some of the bases were a bit mangled (the sides) and a few
of the pegs aren't particularly good fit.
Whats nice: The sheer
number of variants makes this one a winner! And all the speciality packs
are very cool as well, like the hopital or the religion ones for
example.
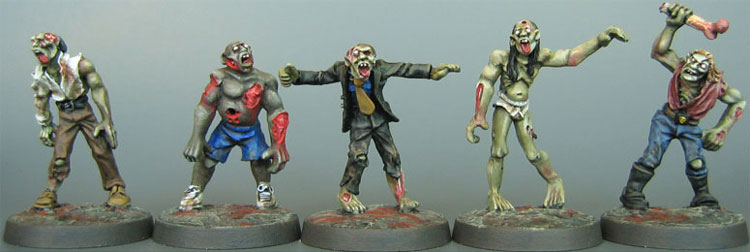
Zombiesmith
http://www.zombiesmith.com/
An
affordable source of zombies to add a lot of variants and interesting
poses to the tabletop. The earlier multipart zombies (which no longer
seem available) were not so nice, but the second range of 20 zombies by
Drew Williams are much better.
These figures uses slotted bases and the miniatures are approximately 30mm from sole to eye.
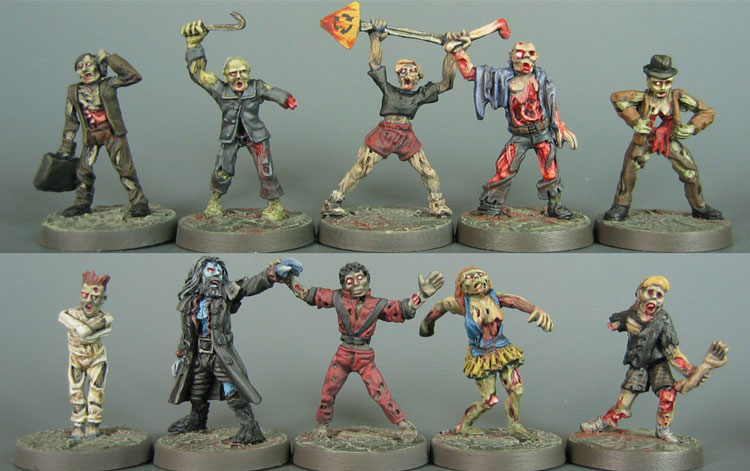
Shown
here are the twenty zombies that form their Zombie Horde by Drew
Williams. In addition to this Drew also made 3 before and after
zombie-fication set. The three sets are a preacher, a hick with a
shotgun and a homemaker.
This
set of zombie kids to the left was sculpted Alan Dyck and they are
quite lovely! The kind folks at Zombiesmith threw them in free of charge
when I ordered the 20 zombie pack.
Sculpting: A rather wide
range in sculpting quality among the zombies here. Some are real gems,
while others are a bit crudely sculpted. Don't let that put you off
though as they are the minority. Damage are nice and interesting, with
exposed internal stuff like bones, brains, guts, etc....
Casting:
The casting is pretty sharp for most of these. Nothing stood out in my
memory while cleaning them so thats always a good sign. One or two of
the minis have a bit of rounded details, but I'm not sure if its caused
by the sculpting, an overused old mould or poor casting.
Whats
nice: The number of variants is a definite strong point with these. Its
not just 20 different zombies, but 20 very different zombies. Each one
is quite individual and different. Particularly fun are the celebrity
zombies!
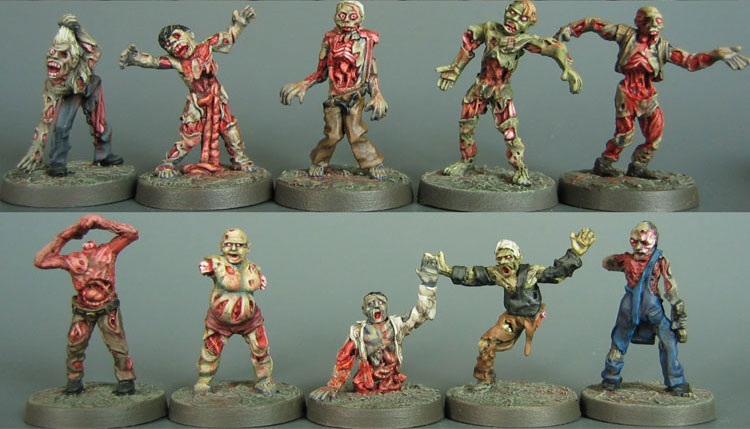
Eureka Miniatures
http://www.eurekamin.com.au/
One
of my favourite manufacters is this Australian shop that turns out some
of the most interesting miniatures on the market. This range of zombies
are sculpted by Kosta Heristanidis and designed to be without any bits
that tie it to a time period so you can use them for any game (mostly)
These figures are mounted on integral bases and are approximately 29mm from sole to eye.
Sculpting:
The overall sculpting is a bit simple, esp obvious on some of the
faces, but the surface detail is amazing. Its a bit gross overall but
they are very lovely sculpts.
Casting: The last thing that I
worry about when I buy from Eureka is the casting. Nic is a top mould
maker and caster and all my Eureka lead comes crisp with minimal casting
imprefections. And a good thing too, with all that gribbly surface
detail...
Whats nice: A fantastic part about the super rich
surface detail is that they are really easy to paint and you can get
them to look reasonably good really really fast. These ten figures are
probably the fastest to paint of all my zombies.
Copplestone Castings
http://www.copplestonecastings.co.uk/
Initially
a star sculptor of Foundry, Mark Copplestone left and started his own
shop, and thats how this tiny powerhouse started.
These zombies
are part of his future wars line which is updated from his old Grenadier
line. I think these zombies are totally new though. There is another
set of 5 zombies in trooper uniforms which I don't have.
These figures are mounted on integral bases and are approximately 30mm from sole to eye.
Sculpting:
Mark's strong point is the ability to sculpt the bare minimum to
produce the maximum goods. All his sculpts are highly simplified and yet
don't look it. Although they are only 5 variants, they are very well
conceptualised. The poses are well done and the cartoony *uuagghhh*
faces are great. His simple sculpting style makes painting them a dream
as well, with both subtle blends and harsh contrasts working equally
well.
Casting: These minis in particular were ok. I've had a few
issues (misaligned casts, obliverated details) with Copplestone's
casting with some of their other minis but they were a minority.
Hasslefree Miniatures
http://www.hasslefreeminiatures.co.uk/
Anyone
immersed in the hobby that knows me knows I'm a huge fan of Hasslefree
Miniatures. This boutique manufacturer run by sculptor Kev White and
wife Sally has been consistently putting out top quality and interesting
product ever since it opened for business. And for a brief period,
everyone went a bit zombie mad, and they produced zombie versions of two
of their modern miniatures, Ashlee and Ray. I hope they do more!
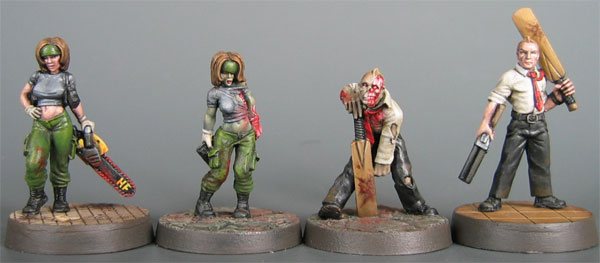
These figures uses slotted bases and are approximately 27-28mm from sole to eye.
Sculpting:
As I have already said, I'm a huge fan and the top quality sculpts are a
big part of that. The basic sculpt is great, anatomy spot on, the pose
is very zombie and the damage is well done, from the exposed rib cage on
Ashlee to the torn face on Ray.
Casting: Hasslefree mini's casting are tip top. I haven't had cause to complain about any of the many figures I have gotten.
Whats
nice: The best part about these minis are the equipment. The cricket
bat alone makes Ray a winner. And while the zombie Ashlee does not have a
chainsaw, her living twin does, and thats cool too. Of course, they
have many more modern living figures so check out their range!
Latest
news is that a third adventurer is slated to be zombified, with a maybe
release date of Jan 07. Can't wait! (the grey of zombie suzi is up.
check it out on the forum of doom!)
Chris FitzPatrick
http://www.crocodilegames.com/
Not
quite sure what the official stance of these miniatures is, but there
have been rumours about on the net that Crocodile Games are selling a
pack of zombies at their trade stands in conventions sculpted by Chris
FitzPatrick. So when a friend wanted to purchase some miniatures direct
from them, I sent an email and got myself a pack (they go for $9.95 USD
for the three). They use slotted bases and stand about 28mm tall.
Sculpting:
These are really beautiful stuff. Some of the best modern zombies in
the market, really gorgeous sculpts. They are exactly what I want my
zombie miniatures to be style-wise and the technical skill is very high,
so yeah, I like them! Esp the two male faces, lovely. The details are
nice, sharp, and abundant (without being overwhelming) and they have
just the right amount of cartoony. Shame there is only three!
Casting:
Nothing beyond the usual irritants, mould line across fingers and hair.
About the casting quality you can expect from good manufacturers such
as GW.
Whats nice: Great choice of subjects given the small number of them! :) Sigh, everything about them is nice!
Latest news, these three and another set of three (which are conversions off these) well be released soon on their website soon!
RAFM
http://www.rafm.com/
Long
time mini manufacturer, RAFM is still famous as the producer of Bob
Murch's Call of Cthulhu line among others. Recently they added a modern
figures line of miniatures, named USX, Modern Day Heroes.
Among
the various characters released was a pack of four zombies sculpted by
James Van Schaik, which came into my possession as a gift from Capt
Arjun. The figures are huge at about 33mm sole to eye, and uses slotted
bases.
Sculpting: The slightly larger scale was not wasted as
the sculptor did a lot of really nice and fine work on it. I especially
liked the fine anatomical detail like the bone on the girl's knee, the
many folds in the figures clothes. Also the face of the flannel guy is
very cool too. Some of the anatomy did seem a bit odd but it was not
too bad. One point of dissappointment was the way the area between the
legs of the construction worker was done.
Casting:
Unfortunately a slightly misaligned casting on the construction worker
made it a nightmare to clean up as all that fine detail is a bit out of
wack! Plus it did one of those most irritating miscast things where the
middle part was indented creating a drain like depression where the
mould line is. The rest was pretty alright but there it did take longer
than normal to clean up.
Games Workshop PLC
http://www.games-workshop.com/
Here
is a manufacturer that needs no introduction. GW has produced a box of
multi-part plastic zombies for their fantasy line. With a bit of work,
they are be modernised. You can click
here to see a photo of the minis before I primed them, so you can see where the alterations were made (the green parts!).
There
were 5 different types of legs and torso I think but the 5th one
required a lot more hacking and sculpting so I didn't convert it. Not
too sure which of the GW stable of sculptors made the masters for these
zombie multiparts.
These figures have no integral bases nor a
slot for the slotted bases. Like several of their other plastic sets,
they just come with big feet for you to stick onto whatever you want,
preferably plastic so you can use the plastic cement. They are
approximately 28mm from sole to eye. I regret sticking them onto square
bases, I really should have used round ones :S
Thanks to a few reminders, I should also point out that the plague zombies for their
Necronumda
game makes great modern zombies as well. There are a few details and
assesories that are out of place but they will still sit in the
shambling crowd nicely.
Sculpting: The OTT cartoony bits are
quite fun and these figures paint up exceptionally well. Even the
absurbly huge paws are a bit charming. I didn't like the lidless eyes so
I fixed that. I added more hair on them too as too many of them were
bald! And like all of their multipart plastics with naked shoulders, the
joints are very ugly so I had to putty over them as well. Also, if I
had noticed all of them having no noses, I would have added one or two
back. Still all in all, they came out quite nicely.
Casting: Pretty much standard plastic casting from GW.
Reaper Miniatures
http://www.reapermini.com/
A
top tier long time American mini manufacturer that targets the RPG
market, here are another bunch of fantasy zombies pressed into modern
service. They have more zombies but these by Stefan Niehues are
particularly good for modern since two of them are in rags and the
third's clothes look modern enough.

This
pack is from their Warlords range and hence are designed for use with a
slotted base and are a bit on the big side at about 30mm sole to eye.
Sculpting:
These are great sculpts, I've always found Stefan's anatomy sculpting a
bit ropey (in a good way) and it also makes for an excellent zombie
sculptor! The musculature is well defined and beautiful, and all the
bones and individual teeth are nicely and precisely sculpted. I esp like
the exposed spine on the one with a shirt (which you can't see in the
photo).
Casting: I seem to get a fair number bad castings from
reaper. While most are good, I've gotten a few misaligned castings. For
this pack the girl zombie had a missing hand. I initially didn't notice
(her being a zombie and all) but while cleaning the mini, the tell tale
rounded blob gave it away. But as I said, she is a zombie, so paint the
thing red and no more problems!
Misc minis
Here we have a few misc zombies.
First
from the left is a convention mini that Pockets2020 sent to me free of
charge (thanks again mate!) It is Ken the Zombie which was given away at
the
Fantasy Partizan some time ago. I don't know a whole lot more about that mini. It comes with an integral base.
Next up, the cute zombie in the middle is sculpted by Steve Buddle and is sold under his
Spyglass line of miniatures. As far as I know, the only place to get this is from
Heresy Miniatures. Check out all the other lovely stuff Andy has there while you are there! This mini uses a slotted base.
On the right is another Steve Buddle sculpt, a really old one for
Kenzer and Co,
who has since then shut down their miniatures division so this is now
OOP. This also uses a slotted base. They also sell a miniatures box
game called
Final Days which contains several zombies, all the same pose. Thanks to grumpypainter for pointing that out.
More Manufacturers!
Some miniatures that I have not painted yet.
Mega Miniatures has a real cheap pack of 20
modern zombies. Nice that unlike the other modern packs they sell, all 20 of the ones in this pack are different.
Discount hobby sell them individually so I picked up the nicer looking ones. Another set that I totally forgot about is this
limited edition one
by Bob Olley. All the clothes (and much more besides...) are rotted
off so it will happily populate your modern table. Thanks to
TheAuldGrump for reminding me of them.
West Wind Productions has a pack of
zombie rock fans
in their gothic horror line which I picked up recently, Have not
removed them from the blister for a closer look but they look like they
could be punk zombies. They also have a modern
rage virus zombies pack in their Road Kill line and the period
zombies
in the gothic horror line can also be used in modern setting without
much difficulty. I think they are sculpted by Andy Cooper but not very
sure.
And some more miniatures that I have not gotten yet.
Brigade Games have a great pack of
Haitian Zombies
sculpted by Faron Betchley in their Caribbean Empires line. The period
is pre-WW2 I think but they look modern enough. Definitely on my buy
list next time I order from Brigade.
Fortress Figures
has a pretty wacky Zombies Plague line of miniatures. You can bulk up
your collection with cheap resin or add some interest with some nasty
characters in metal.
Alpha Forge Games have a few
weird mutated zombies
released. These are not your regular zombies! And all the more cool
for that. There are plans for survivors and maybe more zombies too.
Victory Force Miniatures has got zombie mascots in their
creatures line! Brilliant!
Deadland/Great Rail Wars miniatures has got two packs of zombi-ish looking figures, the
Faminites and the
Deadbeat Band. Thanks to smokeyrone over at the Worldworks forum for pointing them out to me.
Golgo Island (East Riding Miniatures)
has got two packs of 5 zombies. Quite fun looking! Check out some of
the other miniatures as well, really bizzare (in a good way!) humour!
haha!
Heresy has two packs of 4
zombies
and an excellent halfling sculpted by Paul Muller. Some of the
equipment is rather medieval but a few are naked and perfect for modern.
They are really cool looking though and may be worth the effort to
convert the rest! Gorgeous stuff!
Kallistra also has a fantasy range whose
zombies can easily be used in the modern era.
Outcast Miniatures
also seem to have some fantasy zombies that look very interesting.
Some might be usable as is, others might need some work. The faces and
poses are really nice though.
Warg Miniatures has got a pack of
two zombies. The website seems to be dead at the moment, but looks like
Rattlehead Games has got them.
Apparently
Ral Partha had a set of 3 zombies named
11-115 Zombie Lord and Lackeys in their old Ravenloft line. I discovered them on this
page. Now out of production
S1ND3X of
Seraphon Castings
put some zombies up for sale sometime ago on ebay. Latest news
reguarding them is that the masteres are being tweaked for an eventual
sale with reproduction rights.
Finally, for those of you who like to convert, you might try out
West Wind's Seperate Head System
zombie heads.
Big stuff
Graven Images by Jim Bowen has got a lot of gorgeous miniatures, a fair few are zombies. The modern ones can be found in the
Cliffhanger and
Dystopia ranges. These miniatures are 1/48 scale and a fair bit bigger than your average "28mm" figures. Join and visit their
Yahoo group to get updated pics as the website isn't updated often. You should also take a look at the
From Beyond range sculpted by Kev Adams, more gorgeous
zombies there!
The Honourable Lead Boiler Suit Company (HLBS) is another manufacturer that sells 1/48 scale zombies in their
Dead Reckoning line.
Olley's Armies also has a range of zombies in their
Hellsbile Undeads line. They are measured on the website at 33-35mm tall so would be quite big. Beautiful miniatures though.
Unreleased
On the horizon,
Harbinger
has a bunch of really beautiful zombies held up somewhere. Eagerly
awaiting their eventual release as they could very well end up being the
best range in the market from the
pics I have seen.
And alas, a promising
New Evolution Studio
had some really cool looking zombie greens on show at their website but
no updates in a long time and then suddenly the website died. I hope it
gets to the market some point in the near future as they looked really
nice.
Latest news is that the sculptor is gone with some of the greens. Damn! Best of luck getting the project back on track Robert!
It seems as if
Musketeer Miniatures is planing on releasing some
zombies in the future
A bunch of
zombies coming about march from
Aberrant games.
Other games
Moving slightly away,
Wizkids, manufacturer of pre-painted soft plastic started a
Horrorclix
range which has a bunch of zombies in it. I picked up some of them as
singles which are relatively cheap online. Even with the blobby soft
plastic and detail obscuring gunky factory paint, they are still decent.
The poses are nice but dunno how much details in under the paint. Pick
of the lot would be the police one. They are big boys though coming in
the 33mm region.
A popular source of really cheap zombies is
Twilight Creations's
Bag o' Zombies for their Zombies!!! game. There is also a Bag o'
Glowing Zombies with glow in the dark ones and also a new sculpt for a
female zombie, in their Bag o' Babes, which came in the
second edition of the game. These are slightly smaller than most miniatures. They also have a new game
ZombieTown.
Another board game,
Mall of Horror by
Asmodee Editions
also comes with zombie miniatures. I'm not sure about the size but I
had a brief look at the store it seemed to be about 28mm. They are
unfortunately not available seperately like the Zombies!!! ones are as
far as I know.
Also, the
Doom boardgame by
Fantasy Flight Games comes with some zombie plastic miniatures.
WoTC's
Dreamblade
range of collectable (prepainted soft plastics) has a zombie looking
fella called walking worms in the Baxars War expansion set. At least it
looks like one from the front. Never know with the bizarre Dreamblade
figures. The human sized figures from the set that I have seen tend to
be on the larger side of scale, but as mentioned, I have not see the
walking worms figure in real life so I don't know its actual size.
More pre-painted stuff,
Heroscape by Hasbro has a pack of
zombies.
The underpants looks more period fantasy but it might not bother some
people, esp if you manage to find one on sale! Thanks to Fl0ydski at
the Worldworks forum for pointing that out.
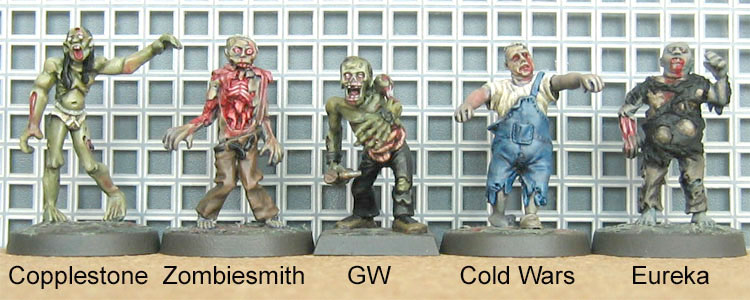
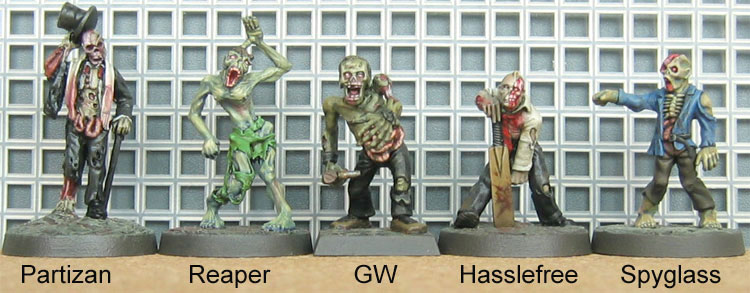
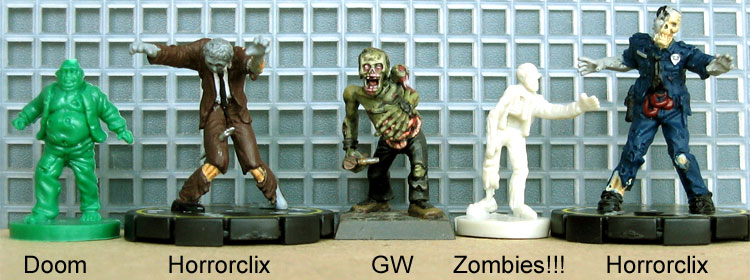
Zombie comparison pictures
Here are some pictures I took comparing zombies from various manufacturers.
Some interesting zombie links
A lot of the initial leg work when I started my zombie hunt was made so much easier thanks to White Knight of
Frothers Unite when he put together
All Things Rotten,
part IV of the undead showcases, which was focused on zombies. While it
has been a while since the showcase is updated, it is still a fantastic
read. It also has a broader scope than here, useful for those of you
who are looking for non-modern zombies.
To me,
Matakishi
is one of the most inspirational figures in the wargaming world. It is
not that he seem to have similiar tastes in genre as me, or that his
work is done to a fairly high level, but the fact that he finishes
project after project that amazes me. As a lover of all things chinese, I
first took notice of his work for the boxers rebellion, but it was his
inner city project that really captured my imagination. And what does
one do with a whole lot of modern inner city terrain? Well, fill it with
zombies of course! Here is a link to his
zombie page, but you should do yourself a huge favour and look around his awesome website and feel the need to start something new!
One of my favourite painters to keep an eye on is
Pappa Midnight.
The link takes you to his zombie gallery at Displaced Miniatures. His
zombies are beautifully gory but do go look around at his other stuff.
Some really nice work in there. In particular I love his conversions
turning everyday folk into the walking dead. Nothing is safe, from eM-4
gangers, to 4 colour fig civilians. He has got some real nice terrain
too!
Sometime ago, I kept a list of
zombie table-top games,
I was going to write a short review as I play each game but never got
round to playing most of them as you can see. Also I left out most of
the rpgs otherwise it would probably take over the whole list. But I did
list a few of those with miniature skirmish support. I need to update
this list at some point.
Finally, there has been so far, 3 zombie
invasions at our local gaming group. The second one is the most well
documented one, and here is a link to a battle report for
Zombie Invasion 2.
Have a look as some of the above zombie in action, trying their best to
get some good munchies. The ruleset we used was a very simplified
version of Street Fight (available for download at the foundry website)
with some add-ons. In fact, it got more and more simplified in each of
the 3 games we played. For game two, the goal was to move into the
centre of the table, and rescue as many of the football babes there as
you can from a horrible death by zombies. Zombie Invasion 1 was
documented in our group gallery which is off having a massage at the
moment. Some pics of
Zombie Invasion 3 was put up by fellow Napnut Boone.
HOME
Comments:
Wow.. This is great! I can
say that this zombie collectible figures are wicked... I love it!
Because the figure is very detailed. Anyway, thanks for sharing and I
definitely visit here more often.
") http://www.manticgames.com/Shop-Home/Special-Offers/Product/Undead-Zombie-Horde-60-Figures.html
http://www.manticgames.com/Shop-Home/Special-Offers/Product/Undead-Zombie-Horde-60-Figures.html


 : 12:34 PM
